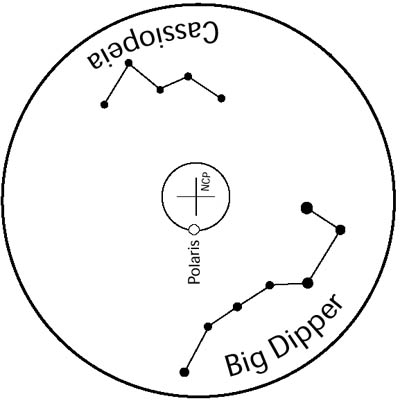
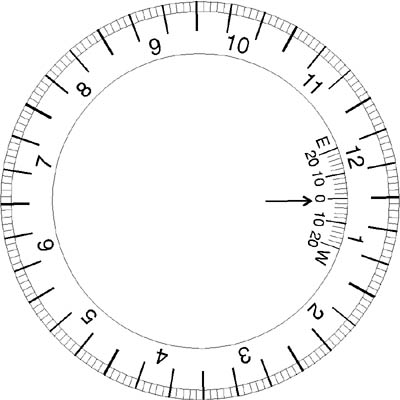
Fig. 1 Reticule for current NEQ6 Mount
Polar Alignment with NEQ6 Mount
1 INTRODUCTION
This technical note sets out the procedures required to accurately Polar Align a Synta NEQ6 Equatorial Mount. Please note that Synta have produced at least two versions of the NEQ6 mount and there have been variations in the arrangement of the RA axis markings. These instructions apply to the NEQ6 with an RA setting circle for use with the numbers that ascend from 0 to 23 in a COUNTER-CLOCKWISE direction (increasing to the left), irrespective of whether they appear on the bottom or top row of the setting circle.
The procedures herein apply only to the Northern Hemisphere.
2 CALIBRATION
(a) Levelling the tripod
Levelling the tripod will make it easier to use the Azimuth and Altitude adjustments on the mount in the future when trying to centre Polaris in the Polar scope as the start position will be a constant. The latest version of the NEQ6 has a built in bubble level.
(b) Preparing the Polar scope for Calibration
Remove the caps from the upper and lower ends of the Right Ascension (RA) axis. To use the Polar scope, the declination (DEC) axis must be rotated such that the hole in the shaft is in front of the Polar scope and the retractable counterweight rod must be released and fully extended. This allows the user to see all the way through the RA shaft.
(c) Aligning the reticule in the Polar scope tube
The reticules in the NEQ6.
Fig. 1 Reticule for current NEQ6 Mount
The optical axis of the Polar scope is already aligned with the rotation axis of the mount and can not be adjusted. This is set permanently at the factory. The reticule in the Polar scope must be centred on the optical axis of the Polar scope. When this is done, the reticule in the Polar scope will be parallel to the rotation axis of the mount. If this is not the case, accurate polar alignment will not be possible.Set up the mount on it’s tripod with a rough visual alignment on Polaris by sighting up the body of the mount in the direction of Polaris. Locate Polaris and place it in the centre of the Polar scope by adjusting the Altitude and Azimuth of the mount. Place Polaris directly under the cross in the centre of the reticule (see Fig.1 above for your reticule). Rotate the mount one half turn about the RA axis. Polaris should remain under the cross in the centre of the reticule. If it doesn’t, the reticule is not centred on the RA axis of the mount and an adjustment must be made. If it is necessary to adjust the position of the reticule, adjust the three small set screws on the Polar scope (see Fig 2).
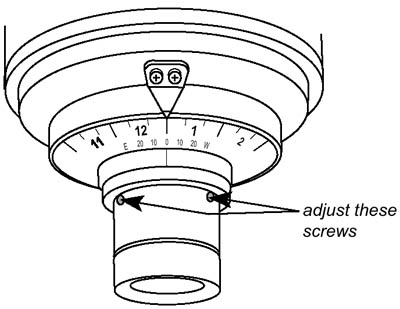
Fig. 2 NEQ6 Reticule AdjustmentMake very small adjustments by moving only two of the screws at a time. Adjust the screws to move Polaris half the distance back to the centre of the reticule. This is because Polaris started in the centre of the reticule and by rotating the mount 180 degrees, Polaris moved exactly twice the distance between the centre of the reticule and the centre of rotation. The centre of rotation lies midway between the centre of the reticule and the new position of Polaris.Do not turn any of the set screws more than one-eighth turn at a time or the reticule will disengage from the set screws. If this mistake is made, the reticule is re-installed by unscrewing the eyepiece and carefully seating the reticule (with it’s threaded retaining collar facing outwards) in the aperture of the Polar scope and gently tightening the set screws. Do not over-tighten these screws too much or the stress could fracture the reticule. Now re-centre Polaris under the cross in the middle of the reticule using the Azimuth and Altitude adjustments.
Repeat the entire procedure until Polaris remains in the centre of the reticule when the mount is rotated about the RA axis. With some practice, you should be able to align the reticule with the RA axis to within about 2 arc-minutes. Once this adjustment has been made successfully, it should not be necessary to carry out this procedure again.
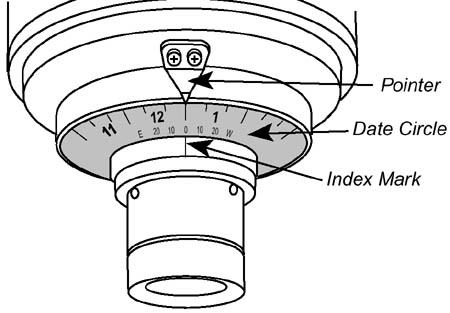
(d) Calibrating the Index Marker
The Polar scope in combination with the RA setting circle constitutes a circular slide rule. This slide rule is used to calculate the hour angle of Polaris at your local time (ignoring Daylight Saving/BST). For the purposes of explaining the calibration process, I am going to use October 16th, at 01:00 am, as from my location Polaris will be in transit at this time which means that when viewed in the Polar scope it will be at the bottom of the view.
Please note - You must find a local time and date at your location when Polaris is in Transit and insert your local time and date into these calibration instructions. The excellent program PolarFinder by Jason Dale can be used to calculate this for you:- polarfinder
The index marker represents a 'zero' for the slide rule. If the zero is not set correctly, the calculated hour angle will not be correct.
Unlock the RA locking knob. Rotate the telescope around the RA axis so the reticule is as shown in Fig. 1 – i.e. with the small circle on the reticule pointing vertically downwards.
Re-tighten the RA locking knob to lock the RA axis. In this position, Polaris is in transit – i.e. it is at its highest point in the sky.
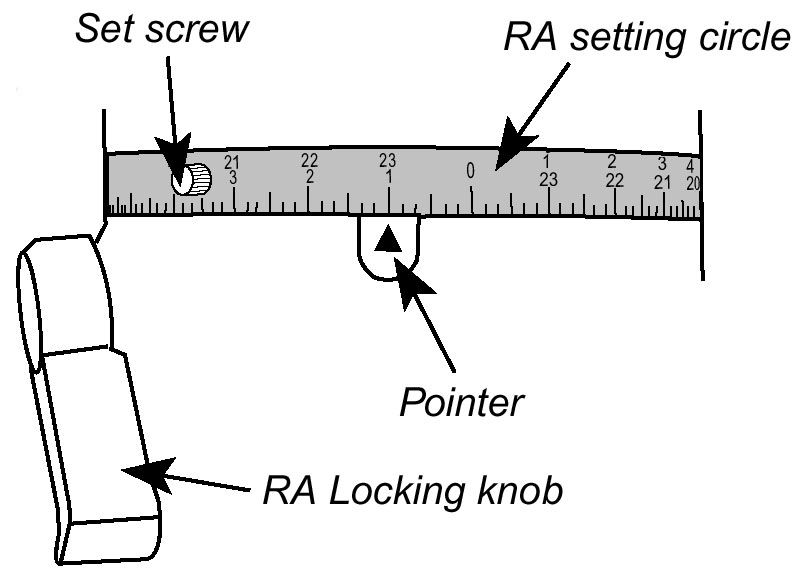
Unlock the RA setting circle by loosening the set screw. Rotate the RA Circle so the pointer indicates 'zero' and lock the RA Circle. This sets the first of two 'zeros' required for the slide rule.
- Now rotate the telescope around RA axis so that the RA Circle indicates 1h 0m on the bottom set of numbers (see Fig. 3).
Fig. 3. NEQ6 RA Setting
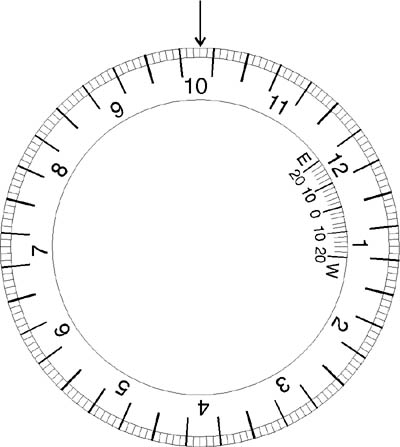
Lock the RA axis. Rotate the Date circle so that October 16th is lined up with the pointer (see Fig. 4).
Fig. 4 Date Circle Alignment for October 16th 2006I
have chosen this date for year 2006 because conveniently, at 1:00 am (actually to be precise, 1:02 am) at MY local time, on October 16, 2006, Polaris is in transit at my location.Rotate the telescope around the RA axis so that the RA circle indicates zero and lock the RA axis. The view through the Polar scope should be the same as before – i.e. with the small circle on the reticule pointing vertically downwards. Next, loosen the set screw on the index marker ring and adjust it so the longitude scale on the Date circle reads your Longitude offset, East or West of the reference meridian for your Time Zone (Fig. 5). Secure the ring by tightening the set screw. This sets the second of the two zero points. In the future, if the reticule has been re-aligned or the index ring has come loose, this procedure must be carried out again to ensure accurate polar alignment.
Fig. 5 Longitude Setting on Date Circle
The Polar scope is now calibrated for your longitude and the Index Mark should be on the right hand side of the Polar scope as shown in Fig. 5.
3 POLAR ALIGNMENT
With the Polar scope accurately calibrated, it can now be put to use to ensure that the mount is correctly aligned with the NCP.Rotate the Date Circle on the Polar scope until the Index Mark is lined up your Longitude offset, East or West of the reference meridian for your Time Zone on the longitude indication (see Fig. 6).
Fig. 6 NEQ6 Zero Setting on Longitude Circle
Now rotate the telescope in RA axis so the pointer at the lower end of the mount points to today's date on the Date Circle (October 16th in this case – see Fig. 4). Tighten the RA lock knob to lock the RA axis in place.Loosen the thumb screw on the RA setting circle and rotate the RA Circle so the pointer points to the current time 01:00 in this example (see Fig. 3). Note that on the NEQ6, the lower set of numbers apply to viewing in the Northern Hemisphere. Tighten the thumb screw to lock the RA Circle in place and rotate the telescope around the RA axis so the pointer points to 0 hours, 0 minutes.
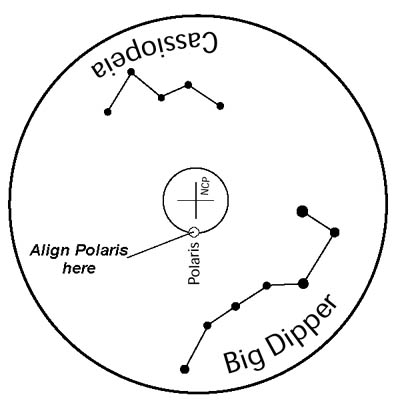
The Polar scope is now at the correct orientation to align with Polaris so using the Altitude and Azimuth adjustments on the mount, align Polaris in the Polar scope so that it appears in the centre of the small circle in the reticule (for this example using 16th October and 01:00 Polaris will be in transit so the view in the Polar scope will be as Fig. 7).
Fig. 7 NEQ6 Alignment of Polaris in reticule